
To rain-proof your treehouse, ensure the roof has a steep pitch and generous overhang to direct water away from walls and supports. But, that's only the start! Read on to learn how to add a waterproof membrane like EPDM rubber roofing for the roof, apply weather-resistant sealants to seams and joints, and install gutters and downspouts to manage runoff.
Key Takeaways
- A roof pitch of at least 45° is crucial for effective water runoff, preventing leaks and extending your treehouse's lifespan by years
- Generous roof overhangs (12-18 inches minimum) create a protective barrier that keeps walls and foundations dry during heavy rainfall
- Flexible flashing systems around tree penetration points accommodate natural movement while maintaining a waterproof seal
- Proper ventilation is just as important as waterproofing—they work together to prevent damaging moisture buildup and wood rot
- Regular maintenance with quality penetrating oils and sealants creates multiple layers of protection against unpredictable weather conditions
Building a treehouse that can withstand Mother Nature's mood swings requires smart waterproofing from the ground up. I've seen countless well-built treehouses reduced to rotting platforms after just a few seasons because someone skipped the crucial waterproofing steps. Whether you're planning your dream treehouse or trying to rescue one that's already leaking, these techniques will keep your aerial sanctuary dry and enjoyable for years to come.

Why Your Treehouse Leaks (And How to Fix It)
Water is remarkably persistent at finding its way into your treehouse. The most common entry points include roof penetrations where trees pass through, poorly sealed windows and doors, and inadequate roof designs. Unlike ground structures, treehouses face unique challenges since they're directly exposed to the elements from all directions and must accommodate the natural movement of growing, swaying trees.
The good news? With thoughtful design and proper materials, you can create a treehouse that remains dry even during heavy downpours. Let's tackle each vulnerable area systematically to create a waterproof sanctuary in the trees.
Common Treehouse Leak Sources:
• Tree penetration points
• Insufficient roof pitch
• Inadequate overhangs
• Unsealed joints between materials
• Poor window/door installation
• Lack of proper drainage systemsEnsuring your treehouse is built on a solid foundation is crucial. For more information, explore our oak tree analysis guide to support your treehouse effectively.
Smart Roof Design: Your First Line of Defence
Your treehouse roof isn't just a covering—it's your primary shield against moisture. When I built my first treehouse, I underestimated how critical roof design would be. That mistake led to months of patching leaks until I finally rebuilt with proper waterproofing techniques. The right roof design prevents problems before they start, making all your other waterproofing efforts more effective.

The Perfect Pitch: Why 45° Is the Magic Number
A properly pitched roof is non-negotiable for treehouse waterproofing. Water needs to run off quickly without pooling, and a minimum 45° pitch achieves this perfectly. This steep angle prevents both rain and snow from accumulating, reducing the weight load during storms and eliminating standing water that inevitably finds its way through even tiny gaps. For more on essential outdoor gear, check out our ultimate bug out bag checklist.
For smaller treehouses, you might get away with a 30° pitch, but I've found anything less invites trouble. The steeper pitch also extends the life of whatever roofing material you choose, as water damage is minimised when moisture quickly sheds off the surface rather than sitting and seeping through.
If you're using shingles, which many DIYers prefer for their classic look, that 45° angle becomes even more important. Shingles rely on gravity and overlapping to create a waterproof barrier, and they simply don't perform well on shallower slopes. Your investment in proper roof pitch will pay dividends in reduced maintenance and repair costs down the road.
Extend Your Eaves: Creating a Protective Umbrella
Generous roof overhangs are your treehouse walls' best friend. I recommend extending your eaves at least 12-18 inches beyond your walls—more if you can accommodate it structurally. These overhangs prevent rain from directly hitting your walls and windows, dramatically reducing moisture exposure to these vulnerable areas. For more tips, check out this guide on waterproofing your treehouse.
Extended eaves also protect your deck or platform from becoming slippery after rain, and they create a nice transition zone between indoor and outdoor spaces during light showers. If your treehouse includes a substantial deck area, consider installing gutters to channel water away from the structure completely, preventing splash-back that can damage your foundation over time. For more tips on incorporating eco-friendly practices, explore sustainable styling ideas.
5 Best Roofing Materials for Treehouses
- Corrugated metal: Lightweight, long-lasting, and excellent for quick water runoff
- Cedar shingles: Natural resistance to moisture and insects with classic aesthetic appeal
- EPDM rubber membrane: Perfect for slightly lower-pitched sections with superior waterproofing
- Corrugated bitumen sheets: Affordable, lightweight, and relatively easy to cut around tree penetrations
- Metal shingles: A Durable and attractive option that sheds water effectively while resisting wind uplift
Avoid the Flat Roof Trap
I can't stress this enough: flat roofs have no place on a treehouse. Even what builders call a “flat roof” on conventional structures includes a slight pitch for drainage. In the treehouse world, where movement and settling occur naturally, a flat roof quickly becomes a swimming pool after heavy rain. Any water that collects will find its way inside eventually, no matter how well you think you've sealed it.
If your design aesthetics push you toward a modern, flat-appearing roof, build in at least a 5° slope to allow for drainage. Remember that trees move and structures settle, so what starts as a minimal slope can become completely flat or even reverse-pitched over time. Always err on the side of more pitch rather than less when planning your treehouse roof.
Waterproof Sealing Techniques That Actually Work
Even with the perfect roof design, you'll need effective sealing techniques to keep water out of your treehouse. Traditional building methods often fail in treehouses because they don't account for the constant movement and unique challenges of arboreal structures. I've tested dozens of waterproofing approaches over the years, and these are the techniques that consistently deliver dry results.
Remember that waterproofing isn't a one-time event—it's a systematic approach that requires attention to detail at every step of construction. The goal is to create multiple layers of protection so that if one fails, others are still working to keep moisture at bay. For additional support, consider the importance of oak tree analysis in your treehouse design.
Tree Penetration Points: The Trickiest Challenge
Tree penetrations through your roof or walls are the most challenging waterproofing issue you'll face. These spots are particularly difficult because trees move in the wind and continue growing throughout the year. Rigid sealing methods inevitably fail as the tree shifts and expands.
I've found that a combination approach works best—starting with a flexible flashing system (like EPDM rubber or silicone boots) that creates a watertight seal while allowing movement. The flashing should extend at least 6 inches up the trunk and be secured with stainless steel bands that can be periodically loosened to accommodate tree growth. This primary barrier should then be covered with a secondary protective layer—typically an adjustable metal flashing that directs water away from the penetration point.
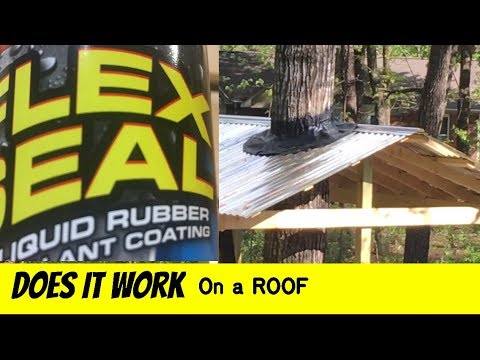
“FLEX SEAL a treehouse roof – YouTube” from www.youtube.com and used with no modifications.
Flexible Flashing Systems That Move With Trees
The key to successful tree penetration sealing is flexibility. I recommend creating a custom “collar” using EPDM rubber roofing material that can stretch and contract with tree movement. Cut the rubber sheet with about a 2-inch smaller diameter than the tree trunk, then carefully stretch it over the trunk to create tension that maintains a seal even during windy conditions. For additional guidance on weatherproofing your tree house, explore available resources.
Secure this flexible membrane to your roofing material using appropriate adhesives designed specifically for EPDM (for rubber roofing) or compatible sealants for other materials. The rubber-to-roof connection should be completely watertight, with the rubber extending at least 8 inches onto the surrounding roofing material in all directions. For added protection, create a sloped “watershed” around each penetration point, ensuring water flows away from rather than toward the tree.
For even better results, consider using a two-part system where the flexible membrane handles the waterproofing while a decorative metal or wood collar provides UV protection for the rubber and creates a finished appearance. Just ensure this decorative element doesn't interfere with the flexible seal's ability to move with the tree.
Window and Door Frame Protection
Windows and doors are notorious leak points in any structure, but especially in treehouses where movement and settling occur regularly. Always install proper flashing above windows and doors, extending at least 6 inches up the wall and tucked under your siding or exterior finish. This creates a watershed that directs moisture away from these vulnerable openings.
For added protection, I apply a high-quality silicone caulk around all frame exteriors, but I'm careful not to seal the bottom completely—leaving small drainage gaps allows any trapped moisture to escape rather than getting trapped and causing rot. Pre-manufactured door and window pans can also be invaluable for directing water away from these critical areas. For those interested in emergency preparedness, consider checking out this ultimate bug out bag checklist to ensure you're ready for any situation.
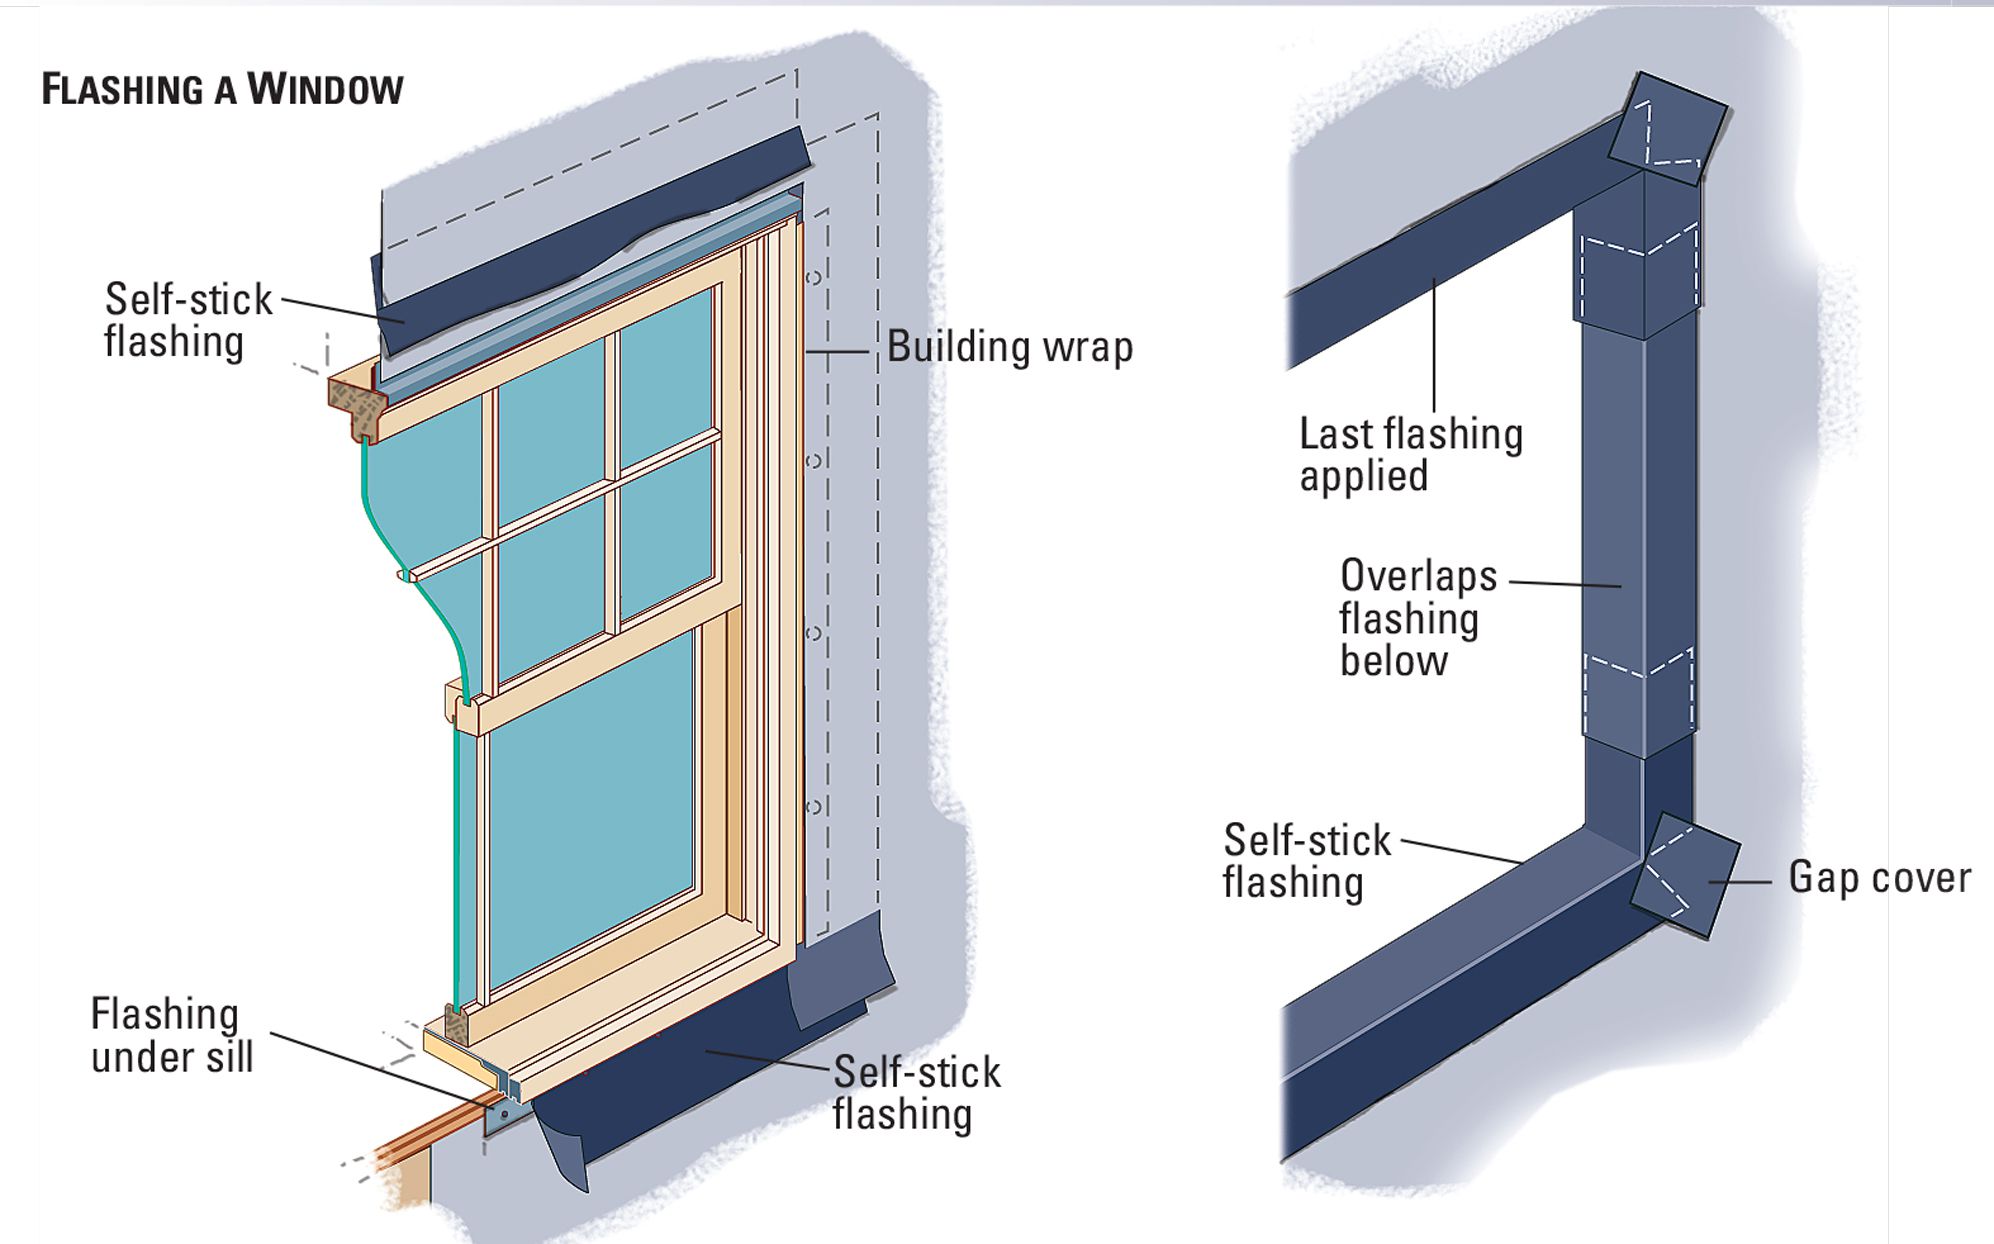
“How to Install Window Flashing to …” from www.bhg.com and used with no modifications.
The Foundation Factor: Keeping Your Base Dry
While most people focus on roof leaks, the floor and foundation of your treehouse are equally vulnerable to moisture damage. Water that collects on your platform can seep into joints, creating perfect conditions for rot and compromising structural integrity. A comprehensive waterproofing strategy must address the foundation with the same care given to the roof. For a detailed guide on protecting your investment, check out this review of photo collage frames, which can offer insights into preserving materials against moisture.
Proper Drainage Solutions for Floor Systems
Every treehouse floor needs intentional drainage paths that prevent water from pooling on surfaces. I design my treehouse floors with a slight pitch (about 1/4 inch per foot) toward the edges to encourage natural drainage. This subtle slope is barely noticeable when walking, but makes a tremendous difference in how quickly water evacuates after rain. For more on treehouse construction, check out this oak tree analysis for treehouse support.
For decking and exterior floor surfaces, maintain 1/8 to 1/4 inch gaps between boards to allow for proper drainage and airflow. These gaps prevent water from pooling on the surface and allow air circulation that speeds drying. I also recommend installing a waterproof membrane beneath any exterior floor system, with proper overlaps and drainage points to channel water away from supporting structures.

“How To Build a Tree Fort – This Old House” from www.thisoldhouse.com and used with no modifications.
Raising Your Floor: The Air Gap Advantage
One of the most effective moisture prevention techniques is creating an air gap between your treehouse floor and any horizontal surfaces. This separation prevents direct moisture transfer and allows airflow that keeps wood dry. I typically maintain at least a 1/2 inch gap between my floor system and any horizontal tree surfaces or platforms.
For enclosed treehouses, I often install a “floating floor” system inside that sits slightly above the structural floor, creating a thermal and moisture barrier while allowing for drainage and airflow beneath. This system typically consists of sleepers (treated 2x4s laid flat) covered with plywood and finished flooring, with the sleepers spaced to allow air movement underneath. For further guidance, consider reviewing an oak tree analysis for treehouse support to ensure your treehouse is both safe and sustainable.
This air gap approach also works wonderfully for outdoor deck areas, where raising the decking slightly above the structural frame creates drainage paths and prevents moisture from being trapped against supporting beams. The small additional effort during construction pays huge dividends in extended floor life and reduced maintenance.
- Use spacers between decking and joists to create drainage channels
- Install drainage mats under enclosed floors for additional moisture protection
- Slope all horizontal surfaces at least 1/4″ per foot for proper water runoff
- Create intentional drain points at the lowest areas of your platform
- Consider a waterproof membrane under your main floor structure
Wood Treatment Strategies for Long-Term Protection
The wood in your treehouse is constantly fighting a battle against moisture. Without proper treatment, even the most carefully designed treehouse will succumb to rot and deterioration within a few short years. I've learned through trial and error that proper wood treatment isn't just about slapping on a coat of sealant—it's about choosing the right products for different areas based on their exposure levels.
Different parts of your treehouse face different moisture challenges. Roof components primarily need UV and rain protection, while floor systems must resist ground moisture and splash-back. Vertical elements like walls require breathable protection that prevents water absorption while allowing trapped moisture to escape. Your treatment strategy should address each area's specific needs, especially when considering oak tree analysis for treehouse support.
Penetrating Oils vs. Sealants: Which Works Better?
The age-old debate between penetrating oils and surface sealants comes down to this: penetrating oils work better for areas with moderate moisture exposure, while sealants excel in high-exposure areas that need maximum protection. Penetrating oils like tung oil or specialized wood oils soak into the wood fibres, providing protection from within while allowing the wood to breathe and adapt to humidity changes. These oils enhance the wood's natural resistance without creating a surface film that can crack or peel.
Surface sealants, on the other hand, create a protective barrier that prevents water from reaching the wood in the first place. These work particularly well for horizontal surfaces like decks and roof elements where water might otherwise sit for extended periods. The downside is that sealants must be perfectly applied and maintained, as any cracks or failures create entry points for moisture that then becomes trapped under the sealant layer. For best results, I often use a hybrid approach—treating wood first with a quality penetrating oil, then applying sealant to high-exposure areas only.
Build It Right: Construction Details That Prevent Leaks
The final aspect of creating a truly waterproof treehouse comes down to construction details that might seem minor but make all the difference in performance. After building several treehouses across various climate zones, I've identified specific construction techniques that consistently outperform standard building methods when it comes to moisture prevention. These techniques address the unique challenges of building in trees while incorporating time-tested waterproofing principles.
Proper Flashing Installation Around Tree Trunks
Tree trunk penetrations require specialised flashing techniques that accommodate growth and movement. Start by creating a base flashing layer using flexible EPDM rubber cut 4-6 inches larger than the tree diameter. Cut a hole slightly smaller than the trunk and stretch it over, creating tension that maintains a seal even during wind movement. Secure this base layer to your roofing material using appropriate adhesives or mechanical fasteners.
Over this primary seal, install a two-piece metal flashing collar that directs water away from the penetration point. This secondary system should be adjustable to accommodate tree growth and seasonal movement. I recommend using stainless steel for this component as it resists corrosion even in continuously damp environments. The top piece should overlap the bottom piece by at least 3 inches, creating a watershed effect.
Inspect and adjust these penetration flashings seasonally, especially after major storms or during periods of rapid tree growth. The small amount of maintenance prevents the catastrophic leaks that often develop around tree penetrations when flashing systems fail. Remember that the tree is alive and growing—your waterproofing system must accommodate this reality.
Creating Water Channels Away From Critical Areas
Intentional water management prevents moisture from accumulating where it can cause damage. Every horizontal surface in your treehouse should include deliberate drainage paths that direct water away from vulnerable areas like joints, seams, and wood-to-wood contacts. This starts with proper sloping of all surfaces—even enclosed floor areas should have slight drainage slopes toward designated exit points.
For deck areas, create drainage channels along joists using shaped blocking or specialised deck drainage systems. These channels collect water that penetrates between decking boards and direct it away from the structural framing. Similarly, window sills should include drip edges and slight outward slopes to prevent water from sitting against the window frame or flowing back toward the wall. For more information on structural support, consider reading this oak tree analysis for treehouse support.
Pay special attention to areas where different components meet—like where walls connect to floors or where railings attach to decks. These transition points are especially vulnerable to water penetration and should include appropriate flashing, drip edges, and sealing to prevent moisture intrusion. The goal is to create a continuous drainage path that moves water from the highest point to the lowest point without allowing it to pool anywhere along the way.
Smart Joinery That Sheds Water
Water-Shedding Joint Techniques
• Lap joints with the upper piece overlapping the lower
• Angled cuts that direct water outward rather than inward
• Capillary breaks at all wood-to-wood connections
• Drip edges underneath horizontal projections
• Ventilated spaces between connected components
The way you connect wood pieces significantly impacts your treehouse's water resistance. Traditional woodworking joinery often focuses on strength rather than water shedding, but in treehouses, you need both. I favour lap joints with the upper piece overlapping the lower, creating a natural watershed that prevents water from entering the joint. Avoid butt joints wherever possible, as these create perfect channels for water to enter.
When working with vertical elements like railings and posts, cut the tops at angles of at least 15 degrees to create a sloped surface that sheds water naturally. For horizontal elements, incorporate drip edges or channels on the undersides to prevent water from tracking back against the main structure. Wherever possible, create capillary breaks—small gaps that prevent water from being drawn into joints through capillary action.
I also recommend leaving small ventilation gaps in non-structural joints to allow trapped moisture to escape. These microscopic breathing spaces make a huge difference in how quickly wood dries after rain events. Combined with proper water-shedding design, these ventilated joints drastically reduce the chance of rot developing in your treehouse's framework.
Weather-Proof Now, Enjoy For Years
Waterproofing isn't an afterthought—it's the foundation of a treehouse that will stand the test of time. The extra hours spent implementing these waterproofing techniques during construction will save you countless hours of maintenance and repair later. A properly waterproofed treehouse can easily last 15-20 years with minimal upkeep, while one built without these considerations might start failing after just a few seasons.
Remember that waterproofing isn't a single solution but a comprehensive system of techniques working together. The roof design prevents most water from reaching your structure, sealing techniques handle the water that does reach critical areas, and proper drainage ensures that any moisture that penetrates these barriers is quickly channelled away before it can cause damage. When all these elements work together, you create a treehouse that remains comfortable and dry regardless of weather conditions.
Take the time to do it right the first time. Source quality materials, follow proper construction techniques, and build with the understanding that your treehouse will face years of weather exposure from all directions. The satisfaction of sitting in your dry, cosy treehouse during a rainstorm makes every extra effort worthwhile. Your treehouse isn't just a fair-weather retreat—with proper waterproofing, it becomes a year-round sanctuary among the trees.
Frequently Asked Questions
After helping numerous DIY enthusiasts with their treehouse projects, I've collected the most common waterproofing questions. These practical solutions address specific challenges you're likely to encounter during your treehouse build or renovation. While every treehouse is unique, these tried-and-tested approaches will work in most situations to keep your structure dry and protected. For more information on treehouse support, you can check out this oak tree analysis.
- How do I waterproof around moving tree branches?
- What's the minimum roof pitch needed for effective waterproofing?
- Can I use standard house flashing for treehouse applications?
- How often should I reapply waterproof coatings?
- What's the best way to test if my waterproofing is effective?
Remember that prevention is always easier than cure when it comes to water damage. If you're unsure about any aspect of your waterproofing plan, it's worth consulting with an experienced builder or doing additional research before proceeding. The small investment in proper planning and materials pays huge dividends in the longevity of your treehouse.
Let's tackle some of the most pressing waterproofing questions I receive from fellow builders, such as how to choose the right materials and tools for the job. For instance, knowing the differences between a Gerber multi-tool and a Leatherman Wave can be crucial when selecting the best tools for waterproofing tasks.
How do I stop rain from coming in where tree branches penetrate the roof?
Tree penetrations require a two-part system: a flexible primary seal and a rigid watershed collar. Start with EPDM rubber (pond liner material works well) cut 4-6 inches larger than the branch diameter. Cut a hole slightly smaller than the branch and stretch it over to create tension. Secure this to your roofing material with appropriate adhesives, then install an adjustable metal flashing collar above it that directs water downward. The flexible base accommodates movement while the rigid collar channels water away. Check and adjust these seals seasonally, especially after storms or during growth periods.
For larger branches, consider building a mini-roof or “witch's hat” above the penetration point that sheds water before it reaches the main roof. This creates an additional barrier that prevents water from pooling around the branch. Always leave space for the branch to move and grow—tight seals inevitably fail as the tree expands or sways in the wind.
What's the best waterproof coating for a treehouse floor?
For treehouse floors, I recommend a three-step approach: First, treat with a deep-penetrating wood preservative containing copper naphthenate or similar compounds that prevent rot from developing within the wood fibers. After this treatment has dried completely (usually 48-72 hours), apply a high-quality penetrating oil like Textrol that maintains the wood's ability to breathe while repelling moisture. Finally, for enclosed areas, top with a marine-grade polyurethane designed for high-traffic areas, applying at least three coats with light sanding between applications. This system provides multiple layers of protection while allowing the wood to adapt to changing humidity levels without cracking or peeling.
How much overhang should my treehouse roof have?
For effective water protection, your treehouse roof should extend at least 12-18 inches beyond the walls on all sides—more if you can accommodate it structurally. This generous overhang prevents rain from directly hitting walls and windows, dramatically reducing moisture exposure to these vulnerable areas. In regions with heavy rainfall or frequent storms, aim for 24-inch overhangs if possible. Remember that roof overhangs serve multiple purposes: they protect walls from direct rainfall, reduce sun exposure that can damage siding, provide partial protection for outdoor areas, and create an attractive visual element that enhances your treehouse's appearance. The small additional cost in roofing materials yields significant protection benefits that extend the life of your entire structure.
Can I waterproof my treehouse after it's already built?
Yes, you can significantly improve an existing treehouse's water resistance, though it's more challenging than building with waterproofing in mind from the start. Begin by addressing the roof—if it's not properly pitched, consider adding a secondary “weatherproofing roof” over the existing structure. This can be as simple as a properly sloped metal roof attached to a lightweight frame above your current roof, with generous overhangs that protect the walls.
For walls and floors, apply quality penetrating sealants after thoroughly cleaning and drying all surfaces. Pay special attention to joints, seams, and areas around windows and doors, using appropriate caulking to seal gaps. Add flashing above windows and doors if missing, and consider installing gutters to direct water away from the structure. While retrofitting won't achieve the same level of protection as building waterproofing into the original design, these improvements can dramatically extend your treehouse's lifespan and make it much more comfortable during inclement weather. For more detailed guidance, explore this treehouse waterproofing guide.
How do I prevent mould growth in my treehouse during rainy seasons?
Mould prevention requires a three-pronged approach: limiting water intrusion, ensuring proper ventilation, and using mould-resistant materials and treatments. Start by implementing all the waterproofing techniques we've discussed to minimise moisture entering the structure. Even with perfect waterproofing, some humidity will enter your treehouse, so proper ventilation becomes crucial.
Install vents at both high and low points in enclosed treehouses to create natural convection that removes humid air. Consider a small solar-powered vent fan for areas with limited natural airflow. For materials, use cedar or redwood where possible, as these contain natural compounds that resist mould growth. Treat all other wood with borate-based preservatives that prevent mould while remaining non-toxic.
During particularly damp seasons, place containers of desiccants like silica gel or DampRid inside your treehouse to absorb excess moisture. These can make a significant difference in maintaining comfortable humidity levels. If your treehouse is frequently used, consider a small dehumidifier for enclosed spaces—even a compact unit can dramatically reduce the conditions that foster mould growth.
The key to long-term mould prevention is creating an environment where wood can dry quickly after exposure to moisture. With proper waterproofing, ventilation, and material selection, your treehouse can remain mould-free even through extended rainy periods. Owatrol USA offers excellent wood treatments that provide lasting protection against moisture and mould while maintaining the natural beauty of your treehouse materials.